Monday, December 28, 2009

What did the Holidays bring for me and my crafting?


This Holiday Season I received an Original Chic Pink Flirty Apron (no more glitter all over my shirt), the Paisley Cricut Cartridge, a 18x24 Fiskars Self-Healing Cutting Mat (no more combining mats to make sure I don't cut off the mat), a Zutter Bind-It-All V2.0 and Zutter DreamKuts, Sixxix Texture Boutique, and a Xyron 250.


Photobucket
Photobucket
Photobucket
Photobucket
Photobucket
Photobucket
Photobucket


What did the Holidays bring for you and your crafting?


Until next time!

2010 Calendar COMING SOON


To create this I used a set of Bo Bunny Binder Chipboard Refill Pages, a variety of paper lines including Bo Bunny, AC, Bazzill, and generic cardstock for the background and page pieces. On one side of the Calendar are the months January-June, the other side shows July-December. For the actual calendar cutouts I used my Cricut Expression and the Designer Calendar Cartridge. It is my first attempt at a Calendar and I'm satisfied with it. My parents were already putting in their orders when I was on February. It was a bit crazy trying to finish it before January 1, 2010.

A little teasers for now:


Photobucket


Photobucket


Photobucket


Photobucket


Photobucket


Photobucket


Photobucket


Photobucket


More photos to come once the project is complete...

Maybe next year I will get more adventurous and open up the project to more than just 1 Cricut Cartridge.

I will say that using my Gypsy helped this project move along quicker. I started by making the individual cuts straight from my Cricut Expression to make sure I was getting what I wanted. Then after making the January page I turned to the Gypsy to make the Templates for the rest of the Calendar. I just needed to change the month and then cut!


Until next time!
~Cassandra~

Recipe Book


This project was created with a Bo Bunny Class Kit.

Included with the kit was:
* 1 set of Bo Bunny Binder Chipboard Refill Pages
* A set of the Kitchen Spice Paper Collection

I also purchased coordinating stickers and embelishments.

This was actually my 2nd project I began working on but it took a bit longer than some of the others because I needed to have my boyfriend out of our shared office so I could complete it (it was a gift for him).

Now he just needs to add in his favorite recipes!


Photobucket


Photobucket


Photobucket


Photobucket


Photobucket


Photobucket


Photobucket


Photobucket


Photobucket


Photobucket


Photobucket


Until next time!
~Cassandra~

UPDATED: My Scraproom


During my Holiday Break I decided to update my Scap-area. Since Santa brought my daughter a new desk that I was able to move into her room, I was able to grow a bit more in my shared Scraproom without having to nicely kick out my boyfriend!

After much work and frustration (on my boyfriends part) this is how my Scraproom ended up:


Photobucket

Photobucket

Photobucket

Photobucket

Photobucket

Photobucket

Photobucket

Photobucket

Photobucket

Photobucket


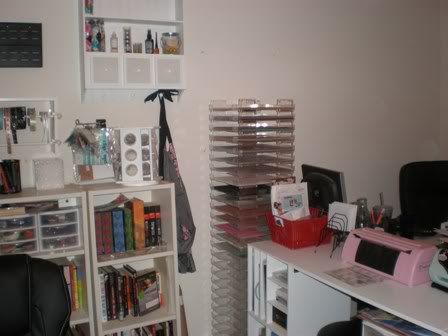
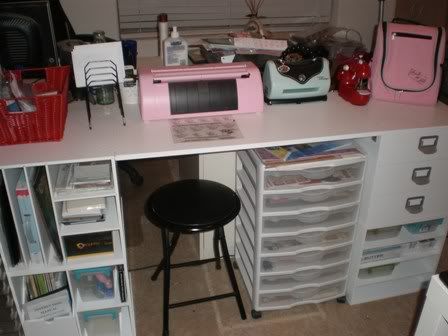
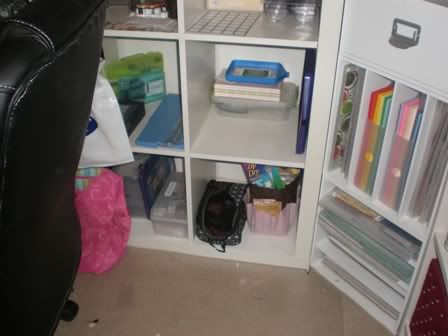
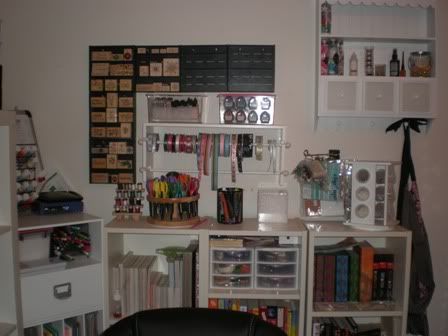
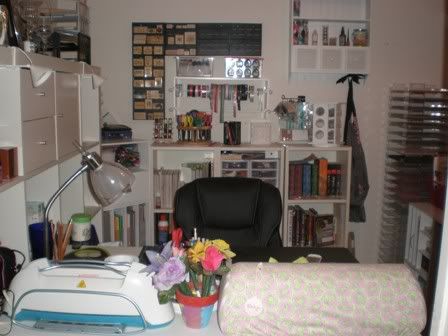
To acomplish this new look I picked up a few more of the Simply Built Scrapbook Storate Cubes from Michael's for 55% off on Thanksgiving. I was able to make a 2nd desk space for myself and declutter my previous working space (my lovely desk setup from IKEA). Now I have a section to work on plus it houses my Cricut Expression (I seem to use this with every project so I needed it close) and YourStory (I still haven't put this to use but plan to in the near future), both by Provo Craft. My 2nd desk space now holds some more papers, YourStory books and lamination sheets, Zutter Bind-It-All, Zutter DreamKuts, Sizzix Texture Boutique, and a miniature sewing machine that I have yet to use on my pages. I am very delighted with my new space.

Please feel free to share your comments!


Click here to view the Before photos of my Scraproom.


Until next time!
~Cassandra~

Thursday, December 17, 2009

**NEW Cricut Cartridges**


Check out Just A Scrappin Blog for more info on:

  • Forever Young
  • Heritage
  • Sentimentals
  • Songbird
  • Tie the Knot


Until next time!
~Cassandra~

Monday, November 30, 2009

Cricut Markers


When I purchased my Cricut Expression it included a few sets of markers and at first I thought you could use them to color in the cuts - guess I shuld have read sooner.

After learning how to actually use them I decided to try it out. I snapped a couple photos when I was making Holiday Tags with one of the new Cricut Mini Carts.

Here is the sheet of tags with the outline completed:

Photobucket

Here is one of the tags after being cut out (see the outline):
Photobucket

It is quite neat and I have seen other sites that provide even more ways to use this technique - I'll try those out one of these days.


Until next time!
~Cassandra~

"DAD" Word Book


I finally finished a full book - well minus the pictures and filled in journal spots. Anyway, I created this for Father's Day 2010, I plan to give it to my Dad.

I'm still learning techniques and such on my own so I enjoy starting out with project kits in order to get a feel for everything scrapbook related. For this book I used a Bo Bunny DAD Class Kit that I purchased on eBay. It included a variety of Bo Bunny items that coordinated perfectly. The Class Kit only provided ideas for the DAD portion of the book but left out the last part of the book that didn't include any letter but just a blank chipboard page. I decided to try being crafty on my own and create the final page so there would be more room for photos or other memorbilia.

I'll update this post once I add in the photos of other items so you can see the complete finished product.

Here is the book thus far:


Photobucket
Photobucket
Photobucket
Photobucket
Photobucket


Until next time!
~Cassandra~

Holiday Cards


Look! Since I'm a newbie to crafting I am quite pleased that I finally finished my first few cards. I am pretty happy with these 4 cards. I actually made about 20 cards and only ended up satisfied with 4 of them. Ugh! At least now I have something to get me going.

The inside and back of the cards are pretty much all the same minus some color variation.

Card #1 Front

Photobucket

Card #2 Front

Photobucket

Card #3 Front

Photobucket

Card #4 Front

Photobucket

Card Inside

Photobucket

Card Back

Photobucket


Supplies Used:
  • Creative Memories paper trimmer
  • Creative Memories rotary set (small and medium circles)
  • Flower Soft adhesive
  • Bead adhesive
  • Your general adhesive and scissors
  • Recollections paper from Michaels (holiday blues)
  • Flower Soft (Polar Ice)
  • Stampin Up Ink Pads
  • Close to My Heart Stamp Sets (Snow Friends, All Decked Out, & Feathery Flakes)
  • Various craft glitter and beads
  • Stickles
  • Various craft pens
  • Close to My Heart coloring pencils


Until next time!
~Cassandra~

Related Posts Plugin for WordPress, Blogger...